Wednesday, October 31, 2012

Homemade Goat Stanchion

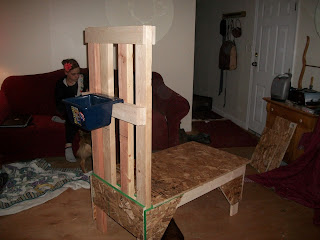
The kids and I built a goat stanchion for our milking goat today. We have been using the back porch that has slats in it with one of them cut so it pivots and holds Mammas head in place (redneck, I know...), but Mamma hates climbing stairs, not to mention we look really strange to our neighbors milking a goat with her head stuck through the porch railing...SO, when we got paid this week, it was off to the hardware store for supplies. The following video was our inspiration:

Josh was very helpful, but we made a few mistakes because we weren't watching the video while we were building, obviously, and I read my written instructions wrong. I put the back legs on wrong, and subsequently put the back braces on wrong as well. No matter. It is still stable and functional. I also changed the way we put the feed bucket on the front of it. Instead of making a shelf, I just made a contraption with a few cuts of 1x4's with spacers in between to hang one of those hook-over feeders from. I think it works better than a shelf, used less wood, and took less time to make.

So, here are a few pictures from our building adventure today:

Make sure you have your "detailed" instructions

Bring everything inside, because it's cold out. Cover furniture with blankets. Make all your cuts and label them with a sharpie.

Make your frame...make sure everything is squared up.

Stand back and enjoy the fruits of your labor...unless you are a small girl...

Then just look cute and take a shnooze.

There's that bucket feeder thing I was talking about. NOW she's awake :)


And don't forget to get your head stuck trying to see how well the locking mechanism works...

The house is covered in sawdust, but we stayed warm all day and really like our finished product. So does Mamma, by the way.

Home Updates

We finally got the wood stove installed. The inspector comes next week to approve of it, I call the insurance agent and get him the important info he needs, and THEN we can have heat!! We have had one minor leak in the system (water not smoke). Isaac climbed up on the roof today and shmeared it with tar. Hopefully that solves the problem.

Our second bathroom has been sitting empty since we moved in and we have been using it as a storage room. The working bathroom is actually pretty icky, but it had a toilet, shower, and sink, the "storage" bathroom didn't have a toilet, so we continued to use the icky bathroom...that is until this past weekend! I gave it a coat of this awesome blue paint, which is a little darker than I had anticipated, but bright and clean feeling nonetheless, and we laid some really really really cheap vinyl remnant down for flooring, painted the cabinet and medicine cabinet white, put up white baseboards, and we are in business! The shower still needs to be worked on, but at least we have a bathroom that company can use and I can stop feeling embarrassed. What really makes me happy about this redo is that after we get the shower up and running I can tear out the other bathroom...totally gut it...lay new sub-flooring and put up new drywall and eventually it will be my pantry/laundry hamper  room/a place to hang coats and place shoes. I know it sounds funny, but that's my plan.

The icky bathroom is laid out exactly the same as the new one, I will rip out the tub, toilet, and sink. Put in a utility sink where the sink currently is, with shelving above it for my laundry supplies, and other things that need to be stored out of the way, like my crockpot, dehydrator, etc. Next to that, where the toilet is, I will have a three hamper system for laundry, with more shelving above that for linens (no linen closets here) and towels. Where the tub currently is, is where my pantry will be. It will have deep shelves, floor to ceiling, with lots of bins to keep things handy and organized. I'm not sure if all my canning will fit in here or not, but it will work well until we get the root cellar done, which will happen sometime next year...right now it's just a 6 x 5 foot hole in the ground :-) So...across from the utility sink and hamper area is a blank wall. It is perfect for a row of hooks with cubbies above for hats, gloves, dog leashes, and other outdoor things we need. There will be cubbies below for shoes and boots, or probably just a long rug where everyone can put their shoes when they come in the back door which is right next to the washer and dryer that sits directly across from my future utility/pantry room. :-) It's all rather exciting and I feel like dancing about just thinking of the utilitarian possibilities of this new space.

In the mean time, in the blustery Michigan hurricane weather, we are going to build a goat milking stand and a hay feeder for the goats. The bathroom will have to wait until funds are appropriated for it, and other areas that are more important get taken care of. Like wood for the wood stove...

Friday, October 19, 2012

Goats and a Pallet Goat Shed

We knew goats were in our future. We had planned on buying a few does and a buck come spring. You know, when things weren't so tight financially, and when we were FULLY prepared to house them and care for them. However, I don't think that was the Father's plan for us. Had I listened to His urging a few months ago, when I was budgeting for fencing and a goat shelter, I would have been fully prepared for the blessing of goats that came this week. But, I didn't. It didn't make sense to spend money on something we wouldn't need until spring...silly me. So, this week we have been scrambling around trying to get everything prepared on a VERY tight budget and with minimal supplies.

Let me introduce you to the goats we will be picking up on Sunday.

The twins are the only ones with names so far:
Lilly
One of our doe kids born this spring.

Lyza
Another doe kid born this spring
Our La Mancha (possibly an Alpine cross...not sure) who is still in milk.

Doe with mangled horns due to a misadventure in horn debudding...

Our Saanen doe...my favorite :-)

Our Alpine Buck. He looks like an X-ray, doesn't he?

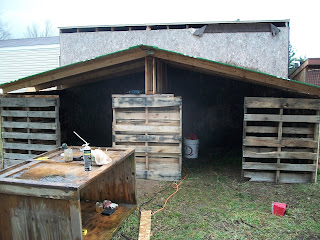
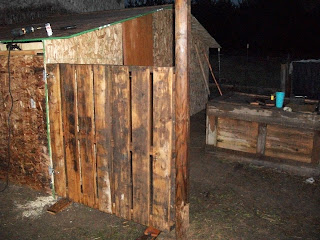
Like I said, we had very little money to build anything with, so we used free pallets, OSB that was on sale, and as few 2x4's as possible. This is what we came up with. Stick around for the final picture, it gets better :-)


One more door to go...it started pouring rain.
 
My awesome pallet gate that I am very proud of!


Free pallets are the best and we are actually pretty happy with the results. We still have a lot of work to do, (fencing, roof, and eventually paint) but this is going to be a warm shelter for our goats this winter. We are so excited to welcome our new additions and it's just another reminder of Divine Providence and how evident it is in our lives.

For my dear friend, here is Charlie at almost a year old, in his favorite spot.

Thursday, October 4, 2012

Oven Baked Steel-Cut Oats

Well, since the fiasco with the stove a few weeks ago, we have been without a stove top or an oven. My cooking appliances have been my crockpot, toaster oven and an electric kettle. We have made a lot of soups, which doesn't bother anybody. We love soups! And we have discovered new ways of cooking the things we like and are convenient for us, or use to be, like eggs. We used to eat eggs for lunch nearly every day. Egg sandwiches, egg salad, quiche, omelets, etc. But, with no stove top, it's a little difficult to make anything other than quiche. We discovered that you can bake whole eggs, in the shell, right in the oven. 30 minutes at 350 degrees and you have a beautiful hard cooked egg! Isn't that nifty? So, it has been an interesting couple of weeks, but we are still eating and eating well.

Breakfast has been my biggest challenge. I have never been able to get the hang of hot cereals in the crockpot. They always turn into paste for me. I've tried different varieties of grains, but still the same result, gag-inducing glue. So, we have made a few new recipes in the toaster oven. One of my FAVORITE recipes has been square pancakes. It's ingenious. No more flipping flapjacks for an hour and sitting down to rubbery luke-warm pancakes. Here is the recipe (they are truly delicious):

~Pancake Squares~ 

1 1/2 c. milk (I use buttermilk)
4 T. melted butter or coconut oil
2 large eggs
1/4 c. sugar, honey, maple syrup, etc.
2 c. whole wheat flour
4 t. baking powder
1/2 t. salt

I ALWAYS add cinnamon and freshly ground nutmeg to pancakes. I couldn't imagine them without it. 

Mix dry ingredients together and add eggs, sugar, milk and butter. Stir until well mixed and pour into a greased 9x13 baking pan. You can top it with blueberries like we do, or pour half the batter in, top with bananas, and then pour the other half in, or top with whatever fruit you prefer. 

Bake at 350 for 20-25 minutes serves 8-12

DELICIOUS!! 

I found this recipe over at Big Red Kitchen and modified it slightly to suit our own tastes (we like a sweet pancake and whole wheat flour).


So, back to my inability to make crockpot hot cereals...we eat a lot of steel-cut oats, freshly ground cream of wheat, rice, and corn cereals, oatmeal, seven grain cereal, and just plain rice with milk, cinnamon, and sugar. However, without a simmering pot to make these in, breakfast has been a little difficult. Until I decided to try baking my steel-cut oats! It worked and here is the recipe (or guidelines I should say):

~Baked Steel-Cut Oats~

1 c. steel-cut oat groats
3 c. water

pour into an 8x8 baking pan and bake at 350 for 40-50 minutes.

You have a few options as far as add ins. You can wait until it is done baking to add sweetener and spices, or you can add them at the beginning. If you add them at the beginning, then you will want to stir your oats in about 30 minutes, because things like cinnamon will just float on top of the water until it starts to thicken. 

Besides adding 1/4 c. brown sugar, honey, maple syrup, etc., we usually add the following:

1 t. cinnamon
1/2 c. raisins
1/2 t. vanilla

or

1/2 t. almond extract
1/2 c. dried cranberries
1/2 c. slivered almonds

or (our favorite)

 1 T. peanut butter
1/2 t. cinnamon

top with a sprinkle of flax seeds and you are ready to start your day!

I think I will stick with my toaster oven steel-cut oats. I ALWAYS have a boil over when I am cooking on the stove top and they ALWAYS stick to the bottom of the pan. (my lowest flame still runs a little high) With the toaster oven I don't have to wait until they start boiling, reduce the heat, and simmer for an eternity. I can just stick them in the oven and forget them for 40 minutes! Now...if I can just figure out RICE, I'll be set. Who needs a stove top? Well, ME! Do you know how to make gravy without one????? White sauce is the basis for many recipes and I have a hankerin' for chicken pot pie...we might have to do some more experiments...